Friday, July 1, 2011

Vegetable-Starch-Protein

I haven't been posting lately. I'm in the throes of summer, which thus far has involved travelling to California, two camping trips involving climbing and a intensive five-week course entitled Vegetable-Starch-Protein Cookery. This is a great class. My chef is Deke Reichardt; he owns the Jackson Street Tavern on 11th and Jackson in the Old Market (go for the duck tacos). Class meets twice a week for seven hours and we, as a class prepare some five to 10 dishes from a set list of recipes and then everyone comes up with their own plate using only the ingredients that arrive in class on a cart.

Chef Reichardt humors me and Maria, who are the only pastry students in the class. We've made baklava, a banana and a blackberry clafoutis, mango semifreddo, rice pudding, bread pudding and pizza dough. For me, it's this great challenge to come up with something completely elaborate. Last session may have taken it all with seared scallops in a lime beurre blance over a barley pilaf with cilantro and tomato. Yeah, beurre blanc. It turns out I did learn a few things in Soups and Sauces class.

Today was day one of a three-day final exam. We were required to present a three-course meal of a wilted spinach salad, beef-short rib and caramelized onion ravioli with a muhroom cream sauce and a cherry clafoutis for dessert. There weren't any recipes, just ingredients and three hours in which to complete everything. It started out (for me at least) like a big cluster. I was assigned the second time slot and was suddenly scrambling to put things together when I didn't need. to. I screwed up the spinach salad with enough time to redo it (the first batch was overdone and inspired the gag reflex). I sauteed the spinach with olive oil and fried some proscuitto with garlic and shallots and deglazed the pan with balsamic vinegar to make a dressing with honey and warm olive oil.
The ravioli turned out so-so. It's surprisingly difficult to produce ravioli thick enough not to break but thin enough to not taste too doughy. Mine was too doughy. But the braised short ribs and caramelized onion stuffing was great. And I loved the sauce, even though it came out a bit on the salty side (I love salt). The clafoutis, of course, was fine, and I even had enough time to throw together a cherry compote sauce on the side. OK, so I did learn something in that awful Soup/Sauce class.
Clafoutis here

Wilted Spinach Salad with Honey Balsamic Dressing:
1 pound fresh spinach
1/4 cup plus 2 tablespoons olive oil
1 shallot, diced
1 clove garlic, minced
1 ounce pancetta or prosciutto
3 ounces balsamic vinegar
1 ounce honey
salt and pepper

Wash spinach dry completely. Moist spinach wilted in olive oil is nasty stuff. Dice up all the veggie and meat. In a saute pan, heat the olive oil on medium. Add the spinach and toss around to coat with oil. Saute until spinach has only just barely wilted and isn't soggy and/or gross (can you tell I have a problem with warm spinach?). Remove from pan. Add the prosciutto and fry up a bit, then add the shallots and garlic. Cook until softened. Remove and pour over spinach. Deglaze the pan with the balsamic vinegar, turning the heat down and touch. Add the honey and then the olive oil and cook until warm. Season with salt and pepper. Toss vinagrette with the warm dressing being careful not to overdo it. Serve.

Basic Braised Beef Short Ribs:
4 beef short ribs
1 tablespoon olive oil
1 onion, coarsely chopped
2 stalks celery, coarsely chopped
2 stalks carrots, coarsely chopped
bay leaf
3 cups stock
                                                                     1/2 cup red wine
                                                                      salt and pepper

So this is your simple braising formula and instructions. Millions of variations exist for you to unfold changing the vegeatables, herbs, braising liquid and deglazing liquid (the wine in this case). Braising may have been one of my greatest culinary discoveries.

Anyway, here's how it goes: Preheat the oven to 300. Heat the oil in an oven-proof pot, like a Dutch oven. Dry the meat and season it with salt and pepper. Sear the outside of the meat in the oil, rotating to get all the sides good and browned. Remove from pot. Saute the vegetables and bay leaf in the same oil. Once they have been coated with oil and softened only slightly, add the wine using a wooden spoon to lift the juicy bits from the bottom of the pan. Once the wine has reduced slightly, return the meat to the pot. Add the stock covering only half of the meat. Bring the stock to a boil. Cover the pot and pop it in the oven for an hour and a half or until the meat is fork tender (it kind of flakes away from the fork when you pierce it).

To fill ravioli, we completed this tedious process in class and then tore apart the meat and mixed it with caramelized onions that I cooked on super duper low heat for several hours (four is standard--seriously, but it's so worth it). I made a little sauce of maple syrup and water and rosemary sprigs that I filled the raviolis with. I wouldn't recommend spending the time making and filling the raviolis because it's a pain in the arse, you should pay professionals to make stuffed raviolis--it is so worth it. The sauce I made was pretty easy though.

Mushroom Cream Sauce:
1 cup beef stock
1/2 cup port wine
4 ounces mixed mushrooms
1/2 cup cream
salt and pepper

Reduce the volume of the beef stock to one fourth. Reduce the volume of the port by half. Combine and add to a saute pan. Add the mushrooms and cook for 5 to 10 minutes. Add the cream to thicken and season with salt and pepper.

Monday, June 20, 2011

On the Lamb

I have a tendency to get carried away. At the first or second farmer's market of the year, I splurged on a leg of lamb. I'm embarassed to say how much it cost. Twenty dollars--just under $20. The farmer swiped my card (very savvy, but a good idea if you're charging that much for meat), I walked away and later thought that spending twenty bones on a raw product was a tad irresponsible for a student. (I paid for it financial aid, and will furthermore justify the purchase by claiming the expense under "studying.") The leg of lamb sat in my freezer for weeks until the perfect moment last week when it wasn't too hot (just enough) and most my friends could come.

I fitted the leg, which took a couple days to dethaw in my fridge, with a Moroccan spice rub under the directions of Molly Stevens who wrote All About Braising, a book that's been on my Amazon wish list for at least a year. I roasted the spices and then sent them through a peppermill twist by aching twist of the wrist. I marinated the leg overnight then cooked the braise with a slew of Mediterranean vegetables, which all got too soggy in the Dutch oven but were still tasty if a bit mushy. Alongside, I made a slaw of sliced carrots and radishes, lighter to complement the heavy hand of the lamb.

Making dinner for friends will probably continue to be one of my favorite things no matter who I'm friends with or where I live. Well worth $20 for a leg of lamb and change for vegetables, although we would have the same happiness with vegetarian pasta so long as there's wine.

Moroccan Spice-rubbed Lamb: From All About Braising by Molly Stevens
Rub:
1/2 teaspoon fennel seeds
1/4 teaspoon coriander seeds
1/4 teaspoon black peppercorns
1/4 teaspoon allspice berries
1 teaspoon coarse salt
1/2 teaspoon ginger
1/4 teaspoon nutmeg
1/4 teaspoon ground cinnamon
1/4 teaspoon ground cloves
pinch turmeric
pinch cayenne

leg of lamb, bone-in
1 onion, sliced
1 bulb fennel, sliced
pinch saffron
1 eggplant, cubed
1 tomato, diced
2 cloves garlic
1 cup chicken/vegetables/beef stock

Heat the fennel seeds, coriander seeds, peppercorns, allspice berries in a saute pan without oil until they are aromatic. Grind with a pestel and mortar. Add the rest of the spices and rub on the exterior of the lamb. Let lamb marinate overnight.

Preheat the oven to 300 degrees. Meanwhile, heat some oil in a cast-iron Dutch oven. Sear the outside of the lamb, remove from heat. Saute the onion. Stir in the saffron threads and some salt. Pour in the stock and bring to a boil. Cover and bake for 30 minutes. Remove from oven and stir in the rest of the vegetables and bake another hour and a half until the meat is fork tender. Remove from oven and remove the lamb, setting it aside covered with foil. Meanwhile, bring the vegetables to a boil to reduce the volume of the liquid. Pour over bulgur wheat or quinoa and serve with lamb.

Carrot-Radish Relish: taught to me by a fellow student
3 carrots, peeled and sliced  into rounds
10 radishes, sliced
1/2 cup white-wine vinegar
1/2 cup apple-cider vinegar
1/2 cup olive oil
1 teaspoon peppercorns
1 teaspoon mustard seeds
1 tablespoon sugar
salt to taste

Slice the carrot and radishes. Meanwhile, heat the vinegar, oil and seasonings until just barely simmering. Remove from heat and pour over vegetables. Let marinate for at least an hour in the fridge. Strain excess liquid and serve.

Wednesday, June 1, 2011

Poached Pear Tart

I've been wanting to delve into more Italian pastries lately. I think it's something of a desire to make something more rustic and less composed than traditional French pastries. What I need is an Italian equivalent to Tartine Bakery's cookbooks, which lean heavily on the French side but is filled with completely awesome recipes (except the tea cakes, which have so far turned out disastrously for me--one sunken and the other spilled over and burned all over the oven). I decided to turn to Lidia Bastianich for some tried and true Italian specialties. She came through with this poached pear tart whose crust was softer than French variations. The ingredients were simple: pears, sugar, lemon juice and apricot jam. The only downside was that the soft dough breached and syrup flowed out of the tart into the oven and then on the counter making a bit of a sticky mess. I've never been known to shy away from a mess though.
Tart Dough:
2 1/2 cups flour
1/4 teaspoon salt
4 tablespoons sugar
8 ounces cold butter
4 egg yolks
2 tablespoons cold water

Filling:
2 1/3 cups sugar
zest from one lemon
2 tablespoons butter
2 1/2 pounds firm pears
apricot jam
egg yolk

Mix all the ingredients for the tart dough in a standing mixer except the water. Add the water slowly until the dough just comes together. Wrap in plastic and refrigerate for an hour or overnight. Roll out and fit into fluted tart pan.

Preheat oven to 350. To make the filling, cut the pears in half and remove seeds. Saute the butter in a saute pan. Add the sugar and lemon zest and stir until it melts. Once the sugar is boiling, add the pears to the pan and cook on each side until softened and pierced easily with a fork. Spread apricot jam on the bottom layer of the dough in the tart pan. Add the pears. Turn up the heat on the sugar and reduce its volume by half. Pour over the pears. If you make a lattice top, glaze with whisked egg yolk. Bake for 40 minutes.

Saturday, May 21, 2011

Like a Radish

I've had several days off this week at the end of my spring quarter and have found myself with quite a bit of free time. Thursday, I rode my bike to Blue Line Coffee to sip espresso and read a great new book borrowed from my friend Liz. Blue Line has these great windows in the front of the shop, which are ideal for people-watching. Sitting and stealing glances at a group of college-age hipsters playing Scrabble outside, it occurred to me that life doesn't get much better than it is right now.

I had wasted the earlier part of that same afternoon nursing along an onion soup from Mastering the Art of French Cooking and assembling an Italian pear tart. The apartment had this musky earthy aroma, subtle in its sweetness like the sun setting over the plains--you only get it if you look up. It took hours for the onions to caramelize. The pears from the tart were so soft they were very nearly falling apart as syrup pooled on my counter dripping from a leak in the levy of pie crust. Those hipsters, with their ironic facial hair, intentional disarray of personal emsemble and poignant use of props (guitar, cigarettes hanging from lips, archaic novel), were a part of the scene of the cloudy May day that reminded me that I am living the life.

Sure, I'm in a perpetual state of singlehood, I feel a bit lost at sea in my writing at the moment and call either one of my parents (typically my mom) on a bi-weekly basis to cry about my woes. But god, this is the life. One made up of caramelized onions and braised radishes, my first purchase from 2011's farmer's markets. There's something so simple and soothing about vegetables, root vegetables in particular. They're a bit ugly, hidden from sight for so long during gestation. A bit of cooking with water and butter, salt, pepper and sugar, and the radish's bitterness was gone. Reducing the water made a pink glaze more radishy than the softened bulbs themselves. They just reek of the spring earth in the best possible way--light and reddish and undeniable crunch, a portend of the heartier roots to come later. So sweet are the carrots, beets, parsnips, and mysteriously, the potato. It's like the earth's great gift: "See how pretty I am even though I'm so brown." Amid the manure, worms and chemical refuse, the dirt holds us down and gives us sustainence.

I'd like to draw an analogy, but instead I'll just tell you that I solemnly swear to spend moreeffort in enjoying roots in a quiet way.

Braised Radishes:
1 pound radishes
salt and pepper
2 tablespoons butter
1 cup water
pinch sugar

Rinse the radishes thoroughly. I soaked them according to Molly Wizenberg's instructions for 20 minutes in water. Melt the butter and heat the water, season with salt and pepper and sugar and bring to a simmer. Add the radishes and simmer covered for 15 to 20 minutes until just softened. Taste the stock and adjust seasonings. Bring to a rolling boil and reduce in volume until the liquid becomes a sauce. Serve sauce over radishes.

Friday, May 20, 2011

Chip-and-dip Time

There is this thing at our apartment that Amanda and I affectionately call “chip-and-dip time.” It’s snack time for grownups. Chip-and-dip time happens around the 3:30 to 4:30 p.m. timeframe. Amanda and I, back for the day from school or work, sit at the kitchen table and spill our guts while stuffing them. The subject matter starts out with drama from boys, friends, co-workers and bosses and then moves more casually into what interesting thing we each heard on NPR. But most importantly chip-and-dip time cannot happen without something smooth and creamy or chunky and something crunchy and salty (tortilla chips, pita crisps, crackers, hard bread, etc.) with which to scoop up the creamy item. The dip has been hummus, salsa is a favorite, cheese, and the other day I made my mom’s bean dip.


Bean anything is a rarity with my mom. She hates beans except in the case of chili. In fact, when I called over to get the recipe and asked if I could replace the black beans with kidney beans she answered an emphatic no before I could finish the question. It’s a vestige from childhood when she was forced to down lima beans before leaving the table. Now that my mom is emancipated and can decide what and how much she eats, what she eats never ever involves beans except in the case of this dip.
The recipe so simple I didn’t even bother to write it down when I talked to her on the phone: one can of black beans in no case to be substituted with anything other than black beans, two tablespoons of pickles jalapenos, some cumin, a crushed garlic clove, salt and pepper, and just enough water to bring the whole thing together in a pot on the stove (so a couple tablespoons tops). Once everything is heated through, you pour the mess of beans into the food processor and pulse until it’s smooth.

Monday, May 16, 2011

Do You Like Pina Coladas?

So I made this brioche recipe, my invention, using part coconut flour, that I am a little bit proud of. The first time I made it, the round loaves were thick and chewy, not the airy texture expected from a brioche. I made some changes, reducing the proportion of the coconut flour, whose smell brings me back to Thailand when I would start my day with a few crunchy coconut cookies purchased a the Walmart-size C Store down the road. The result: a light brioche with a subtle nutty sweetness.

For my artisan bread final, we had to fill and braid a six-strand brioche. Six! Strands! I rolled out the dough and filled them with a coconut-pineapple pastry cream, which came out like a pina colada, and staired at the mass of dough. I may as well have been weaving a rug. Fortuneately, Alexandra knew exaclty how to fold the braids over and under to get an even loaf..

I feel a little invincible in the realm of bread-making. I still got a B on my final and probably bombed the test, but I get it. But the final's resulting bread defied my initial bitterness over having to devote an extra five minutes in the morning to taking care of the sourdough starter while not even getting good bread from all my trouble. Well, now I have good bread, really good bread. I even kept a teeny-tiny dollop of sourdough starter in my fridge, tucked away if I ever get the inspiration to make bread before I forget about it and the bacteria and yeast run out of food and die.

Tropical Brioche:
Pate Fermentee:
4.2 oz. bread flour
2.7 oz. coconut milk
.1 oz. salt
.01 oz. yeast

Final Dough:
23.4 oz. Bread flour
4.2 oz. coconut flour
.28 oz. vital wheat gluten
5 oz. coconut milk
13.7 oz. eggs
.07 oz. agave nectar
.3 oz. yeast
14 oz. butter (cold)
7 oz. pate fermentee

Yields 77 oz., enough for three large loaves

Prepare the pate fermentee the night before by mixing all the ingredients together and letting it sit, covered in plastic wrap, for 12 to 18 hours.

Mix together all the ingredients minus the butter in a bowl of an electric mixer. Pound the butter with a rolling pin to make it maleable. Add the butter one tablespoon at a time to the dough while still mixing it. Continue until the butter is completely incorporated and the dough can be stretched pretty well without breaking. Place the dough in a bowl to ferment. If the butter is melting, place brioche in the refrigerator for 15 minutes or so to come to temperature. Brioche can actually be retarded overnight in the fridge at this point. Let ferment an hour or so. Form into loaves. Brush with mixture of eggs and salt. Proof another hour. Brush with egg wash again and bake at 350 degrees for 30 minutes until golden brown and finished through.

Wednesday, May 11, 2011

Wheat Beer Sourdough

It has been 95 degrees the past couple days, which is the ideal temperature for yeast and bacteria production (note: body temperature is 98). My sourdough culture has reached new levels of growth. This is a photo of the starter a mere two hours after a feeding, exploding with growth all over the counter, floor anything it get its grubby hands on. It may as well enjoy its few remaining days in my kitchen. My bread final exam is tomorrow, after which point this yeast is going down to Chinatown.
We were charged with making our own formula for bread for tomorrow's final, and I'm going to go ahead and toot my horn and say that my bread is pretty good. I'm pleased. The bread pictured above is a wheat beer sourdough with a bulgur wheat soaker. It's got a little spelt flour, just cuz, and yeasty beer for the flavor. It's nutty and has little sour kick to it. And with the weather the way it is, it took no time to rise.

I have somehow, in only 10 days of class and under the tutelage of a great chef, gotten the hang of breadmaking. There are 12 steps that didn't seem straightforward at first that I now more-or-less understand. I know what the bread feels like when it's time to move to the next stage. It's not something you can teach or talk about, it's just known. Once it's mixed, the dough feels this certain way with this certain stickiness that then gets worked out when you ferment and proof it. I mastered the art of shaping at work after forming 200 little pitas into perfect round balls before rolling them out. I do still get impatient and I mess things up a little (notice the exploding portion of the finished loaf above), but I know where I went wrong. I had to run and the bread wasn't quite finished proofing, so I baked it anyway. (I didn't learn any patience in this class unfortunately.) I don't have a spray bottle at home, so the crust of my bread was a little thicker than I'd like. But I know. I understand the process. I can work with the ingredients instead of trying to force them to work for me. That's something.
Wheat Beer Sourdough:
Levain Build:
6.1 oz. whole wheat flour (93.5%)
.5 oz. spelt flour (6.5%)
4 oz. wheat beer (60%)
1.2 oz. sourdough culture (20%)

Soaker:
2.1 oz. cracked (bulgur) wheat (33%)
4.1 oz. water (66%)

Final Dough:
32.9 oz. bread flour (85%)
5.8 oz. spelt flour (15%)
26.7 oz. wheat beer (69%)
2.2 oz. water (5.8%)
.9 oz. salt (2.3%)
11.8 oz. levain build (30.6%)
6.2 oz. soaker (20%)

Build the levain 12 hours or so before you're ready to start the rest of the process by mixing it together, covering it with plastic and letting it rest overnight.

Make the soaker by boiling the water and then pouring it over the wheat and letting it set for 10 minutes.

Assemble the rest of the ingredients. Mix the ingredients until shaggy, let sit for 20 minutes. Work the dough by kneading it until its surface is smooth and the gluten has just about fully developed. Let ferment in a covered bowl for 2 and a half hours, stretching the dough out and folding it over twice during that time. Divide the dough into 20 or 22 ounce portions. This recipe makes 88 ounces, more than enough for four loaves of 20 ounces each. Shape the portions into rounds or batons. Proof for another two hours. Bake at 440 degrees for 40 minutes.

Monday, May 2, 2011

Brioche Recycle

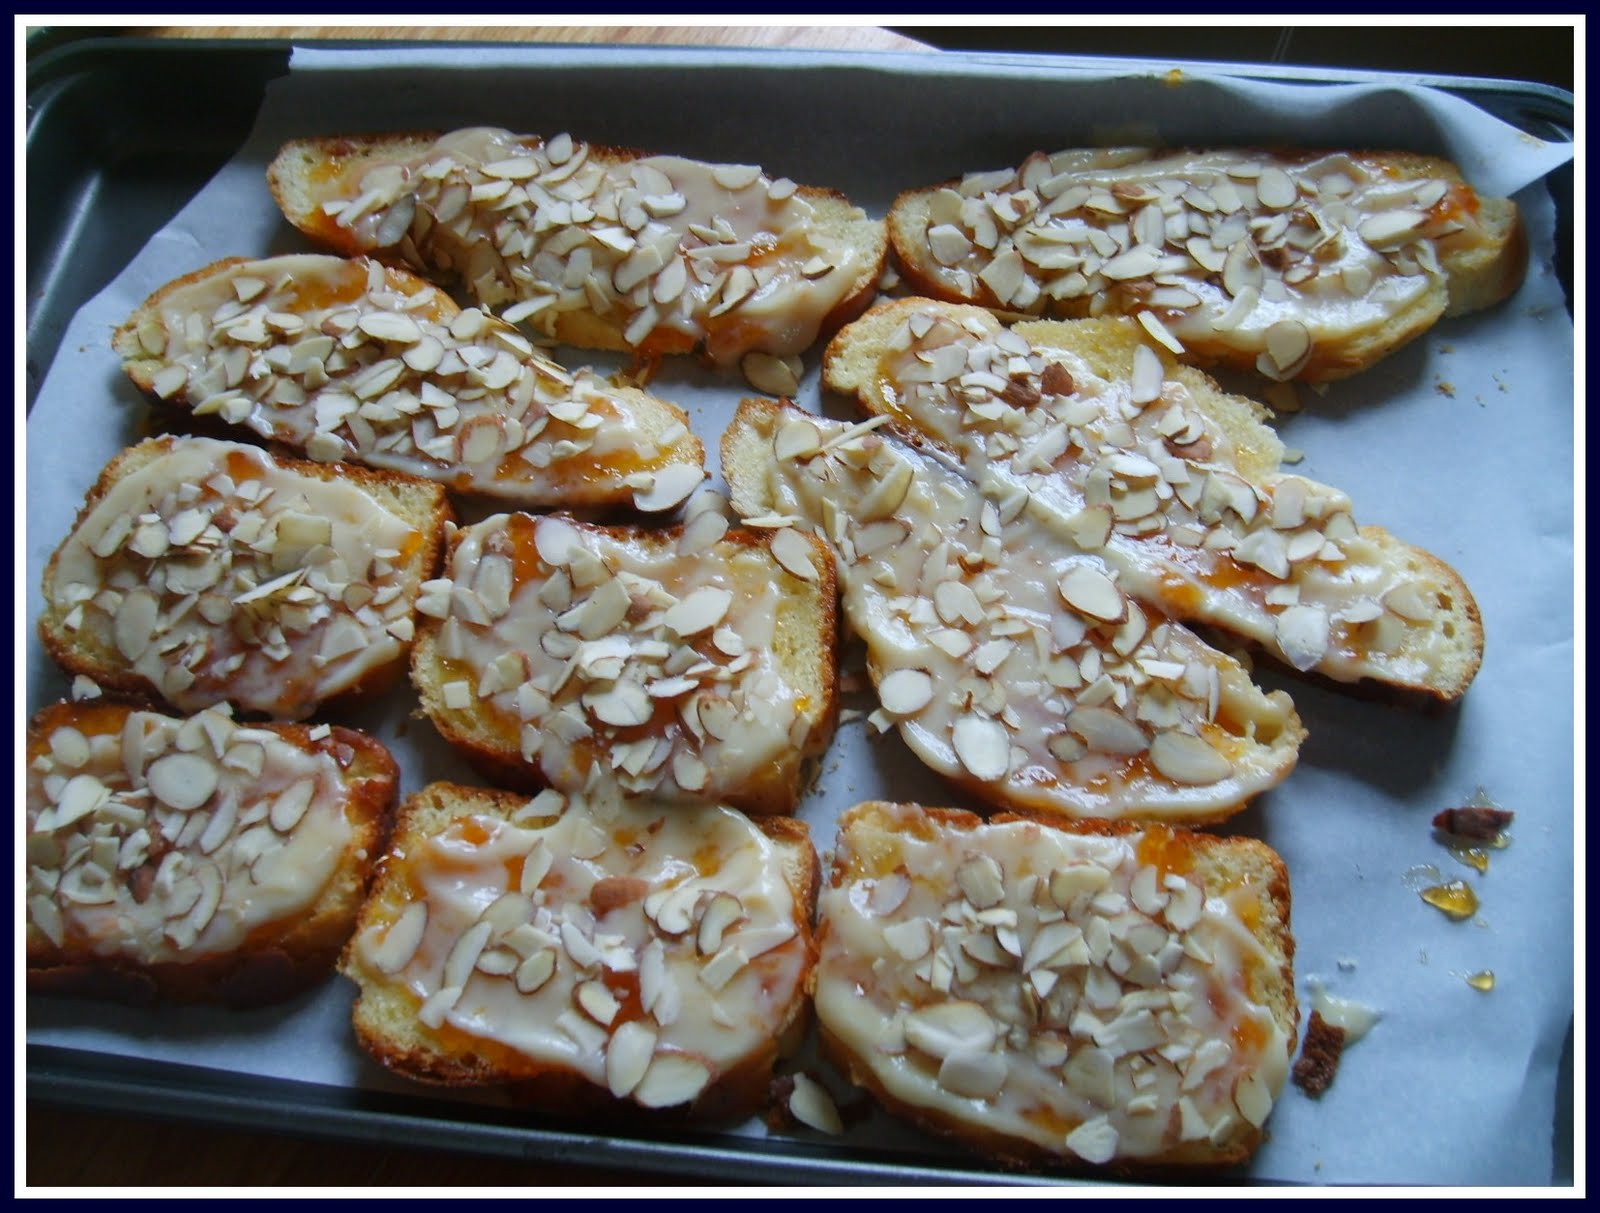
A lot of bread has gotten stale on my counter as a result of this bread class I'm taking. I get so excited to take some extra bread home to try later, but I can't seem to get around to finishing it before it physically transforms into a brick. Not even with my roommate Amanda's help. A week or so ago I had a loaf of challah and a loaf of brioche from school plus a loaf of challah from work that was going to get thrown out during passover. I made French toast a couple times before I discovered a recipe for something called bostock in my trusty Tartine Bakery cookbook.

Bostock is billed as better than French toast, which I'd say is arguable at best--the only similarity is the use of old bread. Slices of rich dough get slathered in simple syrup and coated with apricot jam and the rest of my apricot pastry cream from Easter weekend and topped with almonds. Amanda and I ate several slices for dinner the other night, still steaming hot from the oven (we could really wait until they cooled). The bread had regained its lost moisture, and with crunchy outside edges, the bostock was a bit pastry-like.
Apricot Bostock:
syrup:
1/4 cup water
1/4 cup sugar
2 tablespoons orange liqueur (skipped this)
1/4 cup orange juice
1 tablespoon orange zest

day old brioche slices
apricot jam
apricot pastry cream (or frangipane cream)
sliced almonds

Combine syrup ingredients in a saute pan and heat until sugar has completely dissolved. Remove from heat and let cool.

Slice the brioche and arrange on a parchment paper-line baking sheet. Brush with simple syrup. Spread on the apricot jam and pastry cream. Sprinkle on the almonds. Bake at 375 for 20 to 25 minutes until the bread is toasted.

Wednesday, April 27, 2011

Apricot Pastries

I had my first taste of brioche one week ago today. It's this buttery, light bread that needs no spread to wash it down the throat. It's in a category of rich dough, along with challah and panetone, which are making my artisan bread class well worth the mess and effort. It was obvious Chef Mar thinks very highly of brioche while she's no big fan of most artisan bread (if you're in a bread class, loaf after loaf can get a bit drab). She said many patissieres are using brioche for Danishes and other rich pastries instead of puff pastry because the brioche can have a more complex flavor with the incorporation of a starter of sorts.

I signed up to make laminated brioche. Laminated dough is not, as one might guess, sending dough through a machine to adhere a plastic cover to its exterior. It is folding a piece of butter into the dough, rolling it, folding the dough again, rolling and folding. This laminating is what gives croissants and puff pastry its flakiness. In a hot oven, the dough is rising while the butter is evaporating. As the water from the butter evaporates, it leaves light delicious little pockets all over the croissant, or brioche in this case.
We were charged with filling our laminated brioche. Anything. At first I was thinking of a cream cheese or ricotta something. Chef Mar said something more sophisticated. Apricot glaze popped into my head, then apricot pastry cream and, of course, almonds. I liked the end result so much that I decided to make the pastry for Easter dessert even though it would take me up to 24 hours to complete considering that the brioche was supposed to rest in the refrigerator overnight.

I made the broiche, nearly overheating my little KitchenAid mixer as the dough hook rotated endlessly around the mass of flour, water, sugar and butter. I let it ferment and proof more than the recipe called for and even retarded some of the dough overnight like I was supposed to. And the pastry cream. Oh the pastry cream. It one of those things I would have never done before culinary school. Now that I know how to do it, it's simple, never to be less than sweet and smooth. But it's a daunting task for the beginner to boil the milk with sugar yet not letting the milk to scald, then slowly slowly pouring the milk into a bowl of eggs whisked with cornstarch to the point at which the eggs are certain not to scramble. Then the whole thing goes back on the burner to activated the cornstarch, which thickens near boiling point. Voila, a pudding that I stirred almond extract and apricot jam into and spread along the middle of the rolled-out laminated dough.
I tucked the pastry cream into the dough, braiding it down. After the pastry had proffed once more it was into the oven with it. It puffed up flaky and rich, with a lightness unexpected from something with that much fat in it.
Pastry Cream: from Tartine Bakery cookbook (this book has steered me wrong but once)
2 cups whole milk
1/2 cup plus 1 tablespoon sugar
1/4 teaspoon salt
4 tablespoons cornstarch
2 large eggs
a couple tablespoons butter to finish
1 teaspoon vanilla extract (or other flavoring)

Mix the sugar and milk together in a small stock pot and bring to a light boil. Whisk together salt, cornstarch and eggs. Once milk is boiling, pour it slowly into the eggs while stirring constantly (this does require some agility). Place entire mixture on hot burner and bring to a boil while whisking constantly. Remove from heat once the cream has thickened to a pudding consistency. Flavor as desired to taste.

Laminated Brioche:
600 grams flour
15 grams salt
65 grams sugar
250 grams butter
30 grams yeast
50 grams water
6 eggs

Make sure all the ingredients are cold. Mix all ingredients except butter in a KitchenAid or similar mixer with the dough hook until you can pinch a piece of dough, pull it away and have it stretch but not break (that is full gluten development). Add the butter a tablespoon at a time while still mixing. Ferment an hour and retard overnight in the fridge.

Lamination:
400 grams dough
80 grams butter

Roll dough out into a rectangle. Beat the butter with a rolling pin until it is thinner and more pliable. Place the butter on half the dough and then fold the top half down over it. Roll it out. Fold it three times, roll it out. Fold it three times again and roll it out, resting the dough in between folds, possibly in the fridge so the butter doesn't melt.

Spread the pastry cream down the center of the rolled-out dough. Sprinkle with almonds. You can just roll the dough up like a cinnamon roll or I cut strips along the side and folded the edges in around the pastry cream. Brush with egg wash. Let rise for an hour or until fully proofed and the dough bounces back slowly to the touch. Brush with egg wash again and bake at 350 degrees for 40 to 45 minutes.

Monday, April 25, 2011

The Rye Non-start

Some days I think it might be best if I just stay in bed. Rye flour day in artisan bread was one of those days, except that I had a group presentation, which would have made missing class a little more costly. Actually the presentation was partly to blame for my mess of a morning. I set my alarm for 5 a.m. so I could turn no-knead bread (for the presentation) and then again at 6:30 to bake it. The bread came out just in time for me to hustle off to class with two sourdough starters, a steaming loaf, a necessary cup of coffee, my tool kit (see above) and my book bag. It took two trips to the car. I don't even take that many loads to the car when I go on an actual vacation.

One starter was for Jewish rye bread with a liquidy sponge starter, the other for a 70 percent rye with a soaker and whole wheat flour (that is what the book Bread: A Baker's Book of Techniques and Recipes called it, and I barely know what it means). I made my first haul of the bread loaf and book back into the class, set up a little cutting board and cut myself of my knife. I ran out to my car to get the starters because it was just a touch cool outside and I wouldn't want to kill off my bacteria/yeast culture or anything. Well, the lid of the Jewish rye starter had just popped off, and the soaker had pooled out of the container onto the seat of my car. It was like the blob moving in on the outside world, feasting on anything it could get. The sourdough starter has already adhered itself to my wallet, keys, kitchen floor, various sweaters, book bags and kitchen utensils (this stuff is like industrial glue). Well I introduced a hole host of new bacteria to the culture by scooping up what I could salvage with my hand and scraping it back into the faulty tupperware container. Frazzled I ran back inside before it started raining leaving my keys sitting on the center console of the car. Fortunately, I didn't lock the car and fortunately no one stole it.
Things did turn up in class. When I discovered I had messed up the starter for the 70 percent rye flour recipe (regular flour is not an acceptable substitute for rye), my friend Angie shared with me. Rye flour really soaks up a lot of water and makes this nice denser sandwich bread. Angie really got people excited (no one wants to eat rye bread plain, trust me) by pulling out some duck breast pastrami from her garde manger class and by making 1000 island dressing out of mayo, catsup, sweet pickles, capers, lemon and sriracha. We found some sauerkraut and really dipped into some reubens. Everything ends right with a full stomach thankfully.
Jewish Rye Bread:
Sponge:
96 grams bread flour
96 grams medium rye flour
1/2 teaspoon instant yeast
2 tablespoons sugar
345 grams water, room temperature

Dough:
285 grams bread flour
1 teaspoon instant yeast
2 tablespoons caraway seeds
1/2 tablespoon salt
1/2 tablespoons vegetable oil

Mix all the ingredients for the sponge together. Let ferment for 10 minutes covered.

Saving 1/4 cup of flour, mix the flour with the yeast. Place the flour gently on top of the sponge, cover and let ferment 1 to 2 hours. Add the salt and caraway seeds and mix for 5 to 8 minutes to develop gluten. Bread should be shaggy and moist, but do not add extra flour. Ferment for 40 minutes. Stretch the dough and fold it over on itself. Ferment for another 30 to 40 minutes. Form dough into a round loaf. Proof until it has nearly doubled in size. Score the bread and bake at 450 degrees for 30 to 40 minutes. Let rest for 24 hours before eating.